Getting started – Mobile application tutorial
This tutorial shows how to create an Android application connected to the POSEIDON infrastructure. POSEIDON provides an Android application project with source code, which we call the POSEIDON Starter App. This barebones example app connects to the infrastructure, and can serve as an example and/or a basis for your own app. To get the most out of this tutorial, you should have access to the Starter App code.
The tutorial goes through the basic usage of the infrastructure, often referring to the Starter App code. The APIs, data models and libraries used have their own documentation, and there are parts of the framework not covered by the tutorial. The final section of the tutorial, Further reading, provides references to all the relevant documentation.
Android SDK
POSEIDON Android applications can be developed much like other Android applications, using the official Android SDK. The Android platform has a solid application framework and development environment, used by a very large community of developers. It is well documented on the official developer website:
To develop a POSEIDON Android application, it is a big advantage to have Android development experience. If you have no prior experience, it is a good idea to start with some of the official tutorials on the developer website. User interfaces and interaction uses the normal Android APIs, and so is not a focus for our POSEIDON-specific tutorial. Our primary concern is connecting to the server-side infrastructure, and for this part of application development you will learn enough in this tutorial to make POSEIDON applications.
Development environment
For the development work, the Android SDK is the base, containing the code libraries, build tools and much more. Android Studio is the officially supported development environment, and comes with everything you need. The Starter App is provided as an Android Studio project. If you have not installed Android Studio already, doing so is the first step to start development.
POSEIDON Starter App
The POSEIDON Starter App is available from the developer code page of the POSEIDON web site:
http://www.poseidon-project.org/developers/code/
It is provided as a zip archive with all the needed files. Download and unpack this Android project. Open Android Studio. You’ll want to import the project. If you currently have an open project, you can use the File menu, select New and Import Project… Otherwise, Import project (Eclipse ADT, Gradle, etc.) is one of the main choices from the starting screen. This brings up a file browser; select the Starter App folder. It will then ask to use the Gradle wrapper, which you should OK. It may also ask you to update the project or download the correct version of the Android SDK.
Looking at the project, the two main parts are java (the code) and res (the resource files). The Java code is a small collection of classes, mostly Activities, which are the user interface modules. The resource files are mainly layouts for the activities and graphical resources such as icons. There is also a manifest file – AndroidManifest.xml. This provides a basic definition of the application as a whole. Important are the uses-permission elements, which name protected features the application needs, such as internet access. And each Activity needs to be listed under the application element.
Once everything is set up, you may want to build and run the application (press the green triangle “play” icon on the tool bar). If you have an Android device, connect it to the computer first, so that you may run the application there. Otherwise it will run in a virtual device.
The Starter App connects to the SmartPlatform and file server of the POSEIDON infrastructure, which requires a POSEIDON account. Running the app, it starts with a login screen. If the login is successful, you are presented with a main menu with some actions which test the infrastructure connections. It has no functionality other than showing some debug information from the actions. Its main value is as a basis for new applications and as an example for this tutorial.
Connecting to the server-side POSEIDON infrastructure, as the Starter App does, requires the following information:
| Infrastructure | Information | Value |
| SmartPlatform
File server |
POSEIDON account user name and password | Currently created by the SmartPlatform administrator (Tellu). |
| SmartPlatform | Server address | POSEIDON pilot server: |
| File server | Server address | The pilot file server is on the same address as the SmartPlatform server: |
User interface
As illustrated by the Starter App, a POSEIDON app will typically consist of user interfaces and a little bit of background logic. Communication with the infrastructure is an important part of the background logic, and is the theme of much of this tutorial. User interfaces are technically implemented as in other Android applications, using the mechanisms of the Android platform. The Starter App is a basic example. Note that this does not attempt to follow POSEIDON guidelines for usability, as it is mostly background logic and has minimal user interaction.
Activities and layouts
In Android, the Activity is the basic user interface component, meant to represent some activity where the user interacts with the application. The Starter App has an Activity class for each activity in the app, containing the user interaction code. Which user interface elements to show on screen and how they are laid out, is defined in an XML file. These layout XML files are located in res/layout in the project structure. To make a new function in an application, you can start by making an Activity class and accompanying layout file (copy an existing set as a starting point).
User interface elements
To get started with your own user interface, you can start with one of the layout files from the Starter App, and add, remove and move elements. Android Studio has a graphical tool for working with a layout, letting you drag elements around and see the result.
When you are ready to go beyond the basic functionality of the Starter App, look at the design pages of the Android developer website, if you are not already familiar with Android UI development. And read the user interface guidelines in this document to learn about how to make good, user-friendly interfaces for the primary user group.
The POSEIDON user interface guidelines recommend using the POSEIDON visual theme to create a family resemblance between applications. The Starter App includes definitions of the POSEIDON colours, in res/values/colors.xml. A POSEIDON icon set is available from the project web site, here:
http://www.poseidon-project.org/product/symbols/
SmartPlatform connection – account with preferences
The SmartPlatform server keeps the POSEIDON accounts, and is responsible for authenticating the user and storing preferences. If you wish to use the file server but not the SmartPlatform server directly, it is possible to log in with the POSEIDON account through the file server. However, it is recommended to connect to the SmartPlatform server, to have access to the user profile. The Starter App logs in to the SmartPlatform server and retrieves the preferences.
The Starter App project includes the SmartPlatform API Android library (findit-rest-android.jar). This is an Android/Java wrapper for the HTTP REST API. Data is exchanged in JSON format, and the library uses the org.json Java JSON representation, which comes with Android. In the Starter App, we manage the use of this API through the class StarterApp. This class extends the Android Application class, a class which represents the application as a whole, which is created when the application is created, and which is always accessible to Activities. To use this class for the application object, we must specify it in the manifest file (android:name under application). We have put the SmartPlatform interaction there so that it stays in memory regardless of Activities coming and going. In a larger application, you may consider putting it in an Android Service object.
Logging in
The LoginActivity is the launcher activity of the Starter App – the initial Activity started when launching the application. It brings up a login screen, for entering the POSEIDON user name and password. When the user clicks to log in, we call a login method on the StarterApp, which in turn handles the API transactions. On success, it launches the next Activity, with the main menu.
StarterApp.login shows how we typically start a session with the SmartPlatform server. We use the AsyncService class from the API library, which handles the transactions in an asynchronous way, with callback objects being called on success or failure. It is important not to block the main thread with a network transaction, as that would make the user interface unresponsive.

In the code above, we create the AsyncService object, and run the first transaction. This transaction sends the user name and password to the server, and if accepted it gets back an authentication token. This token must be included with all requests to the SmartPlatform server, as well as the file server, which uses the same account and authentication. The AsyncService object handles this for us. Once the initiate transaction is successful, the object can be used to do other transactions, and we must keep this object as long as we want to stay logged in. At this point we can retrieve a ServiceSpec object with various information about the session. We can get the authentication token, if we need it for the file server.
Retrieving the asset – primary user profile
Asset objects in SmartPlatform represent tracked entities – in our case primary users. Note that it is possible for an account to have access to any number of assets. In POSEIDON pilots we have had accounts with a single asset, for the primary/secondary user pair, as well as tertiary user accounts with access to a larger set of assets.
The Starter App is made for accounts with exactly one primary user, which means it expects there to be exactly one asset (if there are multiple, it just selects the first). It retrieves the list of assets directly after the initiate transaction succeeds. This is a GetTransaction, resulting in a JSONArray of JSON objects.
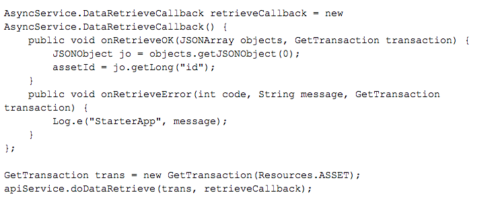
When retrieving a list of object, each entry will by default have a minimum of data, to identify the object but not give details. We are interested in the asset ID, which uniquely identifies the asset and can be used to retrieve the detailed asset object. In the Starter App, we also get the ID of the “positionProvider”, which represents a device which can post observations and events into the SmartPlatform. We show how to post such data later in this tutorial.
Each asset in the list also has a name. If you want to add support for having multiple primary users, you need to consider the whole list returned by this transaction. If there are more than one, you could list the names in the user interface, for the user to select one.
Asset properties – user preferences
When we have the asset ID, we can get the complete asset object for this primary user by setting the ID on a GetTransaction. Note that we use a different callback, for a single JSONObject.
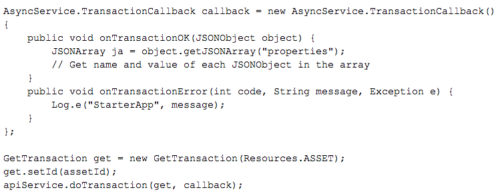
The asset object holds various information about the primary user, including the last known position. We are mainly interested in the properties, where we store POSEIDON user preferences and other settings, to be shared between applications. This is an array of JSON objects. For reading the preferences, we are interested in the “name” and “value” properties. The Starter App shows how to retrieve these, listing them all in the user interface when selecting the LIST PREFERENCES option in the main menu (PreferencesActivity in the code).
An application can update much of the information in an asset, such as a property value, writing the changes back to the server. To update an existing asset, we must use a PutTransaction.
![]()
In this code, asset is a JSONObject, like the one returned above. It does not need to be complete; it only needs the “id” field and whatever data we want to update. But a property object needs to include a field “typePropertyIdentifier”, as that identifies the property in the SmartPlatform system. You may modify the JSON retrieved, and then send back the whole thing.
File server connection – cloud storage
The POSEIDON file server provides a common cloud storage for user data. It is used for instructional content, which is typically entered by a secondary user through the POSEIDON web application or a special-purpose app, and used by the primary user through primary user apps. Pilot content includes media, routes for navigation and shopping lists.
The file server has an HTTP API. Files are uniquely identified with a resource ID, and they are categorized with a type, which is intended to work much like directories in a file system, giving us a way to organize the files. Uploading a new file assigns it a resource ID. We use this ID to retrieve the file, and to provide a new version of an existing file. We can get a list of all files, or those of a specific type.
There is no Java wrapper for this API, so the recommendation is to use java.net.HttpURLConnection to do HTTP transactions. The Starter App code shows examples of this. The transactions themselves are all found in the class FileServerTransactions. A number of Activities, available from the main menu, run these and show the result.
File content
Before you start interacting with the file server, you need to have a clear idea of what you want to store and/or retrieve. It can be any type of file, but there are some types already defined by the developer framework and used by other applications. In the POSEIDON project, we found that instructional content typically has two aspects: some structured data with text, and some associated media. The structured data could be a shopping list – a set of products with quantities and prices – or a route for navigation – a list of geographic coordinates with instructions on how to get to the next point. This is typically stored in JSON or XML format. As we want to use more than just text to convey the instructions, the structured data may also refer to images, sound or video files. Each of these media files are uploaded to the file server, where it is given a resource ID. This resource ID is entered in the XML or other structured data, to use the media file in the instruction. In this way, an instructional content such as a shopping list will consist of a set of files.
You can look at the various data specifications of the framework, to see if and how to make use of one of the existing forms of instructional data (see Further reading at the end of this chapter). Or you can define your own for a new type of functionality.
Authentication
The POSEIDON account is used for authentication, with the file server connecting to the SmartPlatform to authenticate the user. The requests must contain the same authentication token as used for the SmartPlatform API. We have already seen how to get this from the AsyncService if we have logged in that way. If we only want to use the file server, we can send the user name and password there, and get back the authentication token. See the method FileServerTransactions. authOnFileServer for how this can be done.
Retrieving files
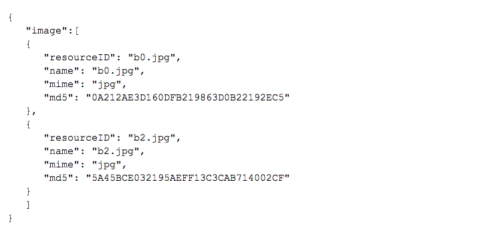
To retrieve files, we typically first do a GET request for a list of files, specifying a type if we want to limit it to that type. This returns a JSON listing the files, with a resource ID and original file name for each. An MD5 hash is also given, if we already have files cached locally, and we want to check if the local copy matches that on the server or not.

Example reply:
Starter App implementation: FileServerTransaction.listResources
Knowing the resource IDs, we can retrieve specific files one by one. This is a GET request with a resource ID, which returns the stream of bytes making up the file.

The StarterApp method FileServerTransactions.fetchResources shows how this can be done in Java code, in this case getting an image and showing it directly. Alternatively, the byte stream could be saved to a file, so that we have it stored locally and don’t need to download it each time it is used.
Uploading files
The File server API specification shows how to add a new file, posting with the multipart/form-data content type. This combines several different entities in one payload, specifically the file type and file name as well as the file itself in this case. It works well for web applications, but we have not been able to find a good way to do this in Android code. In Android we therefore have to split this transaction into two stages, and use the alternative resource2.php on the server.
First, we post the type and filename. This returns a JSON which contains the resource ID assigned to the new file.

Starter App implementation: FileServerTransaction. addResource
We can now upload the file itself in a POST request, specifying the resource ID in the URL.

Starter App implementation: FileServerTransaction.uploadFile
In the Starter App code, the AddResourceActivity shows how this is done, using both FileServerTransaction methods.
If we change a file which is already on the file server, we should upload the new version of the file using the existing resource ID, so that it replaces the old version. This is exactly the same as the second stage when uploading a new file, specifying the resourceID in the URL. So this is done with the FileServerTransaction.uploadFile method.
Deleting files
If a file is no longer used, it should be deleted from the file server, to free the space. This is done with a simple DELETE request, specifying the resource ID of the file to delete.

FileServerTransaction.deleteResource implements this transaction. The main menu item for deleting a resource invokes PrepairDeletingActivity to get a resource ID, with DeleteResourceActivity running the delete transaction.
SmartPlatform edge connection – sending observations
In addition to the SmartPlatform REST API where data objects such as the asset can be retrieved and updated, this server has another API with its own Android/Java wrapper library. This is the so-called edge API. A core function of the SmartPlatform is to collect and aggregate data. This may be sensor data from various sensor devices and gateways, and the platform has various edges to talk to various device types. From an Android application we can post data in a JSON format to an HTTP edge. A wrapper library for this is provided as part of the POSEIDON framework, and included with the Starter App project. The ObservationActivity class demonstrates its usage.
In SmartPlatform terminology, a set of data posted in this way is known as an observation. All observations posted to the SmartPlatform server is stored in a history database. Both the latest values and the history may be shown in the monitoring part of the POSEIDON web application. The main POSEIDON pilot app posts various forms of information. It tracks the position of the user, and regularly posts the current position. This also includes the battery status of the device. It also posts log and error messages, as this was used in the research project to see how much each function was used and which problems occurred.
Device entry
Posting to an edge does NOT require authentication with an account. Instead, the device posting observations must be registered in the SmartPlatform with a Device entry, with a unique ID used to identify the source of the observations. Each POSEIDON asset has a device associated with it, representing the device running the apps. In the Starter App, we retrieve a device ID in the “positionProvider” field of the asset. This is not the ID we can use to post observations, but rather a foreign key referring to a device object. StarterApp.getDevice retrieves the device object:
![]()
In the device object, we need the field called “uuid”:

Posting observation
The class AsyncEdgePoster from the edge library handles edge transactions. As shown in the code above, we need a URL and a device UUID to instantiate an object.
The class Observation in this library represents the data we can post. It has some built-in fields, such as timestamp and position. The rest of the data is simply a list of key-value pairs, so here we can put whatever we want to track. The Starter App ObservationActivity posts some test data:

Context middleware connection
The POSEIDON Context Reasoner Middleware is an Android component which can run in the background on Android devices and provide context information to POSEIDON applications. It is a separate installation, available on Google Play:
https://play.google.com/store/apps/details?id=org.poseidon_project.context
The source code is available on GitHub:
https://github.com/deankramer/POSEIDON-Context
Here we will give a summary of how to use the context reasoner from a POSEIDON application. We refer to the project deliverables (see Further reading below) for a more detailed description.
Context Observers
The application using the middleware subscribes to specific contexts, to receive a message each time there is new information about these contexts. The following contexts are available:
- BatteryContext: Monitors the remaining amount of device battery in percent
- WifiContext: Monitors the status of the WiFi receiver on the device, whether it is not active, disconnected, connecting, or connected to an access point
- TelephonyContext: Monitors multiple parameters of the device’s telephony receiver. This currently includes connection status, and whether the device is currently roaming
- CompassContext: Monitors the current orientation of the device in degrees.
- LightContext: Monitors the current amount of ambient light, measured in lumens.
- ExternalStorageSpaceContext: Monitors the amount of storage space remaining on the device shared storage area including the SD card, measured in megabytes (MB)
- GPSIndoorOutdoorContext: Monitors and deduces if the device is indoors or outdoors using the GPS receiver.
- WeatherContext: Monitors and sends weather data for defined locations.
- StepCounter: Monitors the current number of steps the user walks within a given interval.
- DistanceTravelledContext: Monitors the total distance the device moves within a given interval.
The middleware is extensible, and both Context Observers and rules for the reasoner can be added, but this is outside the scope of this tutorial.
Usage
Connecting an app to the middleware requires an AIDL (Android Interface Definition Language) file, which defines methods for the app code to communicate with the middleware. This file is found in the source on GitHub, in the following location:
![]()
Copy this into the app project src folder.
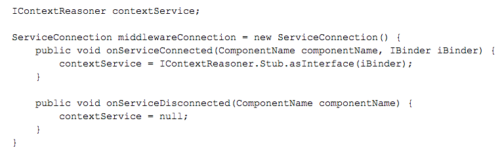
To use this interface, the app must first connect to the middleware by calling bindService on a context (this could be done in an Activity, or the Application object).
![]()
middlewareConnection here is an object implementing the ServiceConnection interface:
If the connection is successful, onServiceConnected is called, and we get a reference to an object implementing the AIDL interface. To subscribe to context data, we call its addContextRequirement method, or addContextRequirementWithParameters if the context requires parameters for configuration. Arguments are the package name of our app, and the name of the context to subscribe to, for instance:
![]()
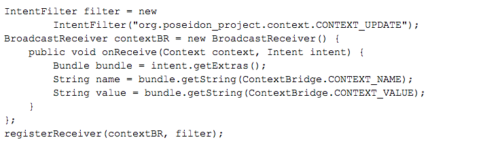
The middleware will broadcast context updates using Android’s Intent mechanism as long as there are subscribers to the context. Our app needs to register a BroadcastReceiver to catch the Intents. The context data is in the Intent extras:
Finally, we must call removeContextRequirement when the subscription is no longer needed, so that the middleware can stop its observing and reasoning:
![]()
Further reading
Here is a collection of references to other documentation relevant for developing POSEIDON Android applications. All is available from the POSEIDON website, in the developer documentation section unless otherwise noted.
User interfaces
- User interface section of these guidelines.
- D4.2 Adaptive tablet interface: Adaptive aspects in the implemented POSEIDON app interface.
- D4.5 HCI user and developer manuals chapter 4: Android User Interface Implementation – describes important aspects of the Android platform in relation to user interaction (summarised in the user interface guidelines).
SmartPlatform
- SmartPlatform-developer-doc.pdf: Developer documentation for the SmartPlatform part of the infrastructure, including API specification.
- rest-lib-java: Documentation for the SmartPlatform API wrapper library (Javadoc) is included in the rest-lib-java archive available from the Code section of the POSEIDON website.
- edge-lib-java: Documentation for the SmartPlatform edge wrapper library (Javadoc) is included in the edge-lib-java archive available from the Code section of the POSEIDON website.
- D5.1 Development framework, chapter 5.1: Description of the platform and its role in POSEIDON.
File server and data specifications
- File-server-API.pdf: Specification of the file server HTTP API.
- Route-data-specification.pdf: Developer documentation for route data for navigation.
- Shopping-list-data-specification.pdf: Specification of JSON data for shopping lists.
- Video-list-data-specification.pdf: Specification of JSON data for video lists.
- D5.1 Development framework, chapter 5.2: High-level description.
Context middleware
- D5.1 Development framework, chapter 5.4: Developer documentation for the middleware.
- D3.2 Reasoning and Learning module: Background documentation for the context reasoning (available on the Deliverables page of the website).
Calendar integration
The POSEIDON developer framework also specifies use of calendar data. The Google Calendar service is used to store the calendar events, but with POSEIDON-specific structured content. As with other instructional content, this can refer to media files on the POSEIDON file server.
- Calendar-data-specification.pdf: Data specification and other developer information.
- D5.1 Development framework, chapter 5.3: Architecture and conceptual model.